
Crossing Midline Examples
What is crossing midline and why is it important? Let’s start with some examples of crossing midline.
- If a child is ready to start coloring and his favorite colored crayon is on the left side of the table, but his dominant hand is his right hand, he may cross midline to reach for that crayon. If he does not easily cross midline, then he may pick up the crayon with his left hand and transfer it to his other hand at midline (the middle of his body).
- If a child is looking at pictures in a book, if she is able to cross midline easily, she may turn the pages with one hand, reaching from one side to the other. If she does not cross midline easily, she may lift the page with her right hand, transfer to her left hand and finishing turning the page with her left hand.
- If a child has velcro shoes and easily crosses midline, he may velcro both of his shoes with his dominant hand. If he has a difficult time crossing midline, he may velcro his left shoe with his left hand and his right shoe with his right hand.
Activities That Require Crossing Midline
Crossing midline is something that starts to develop in infancy, and is generally fully developed mid elementary age.
Let’s talk about some every day activities that crossing midline makes so much easier, and this will give you an idea of why crossing midline is important.
- Writing a sentence across a piece of paper
- Tying your shoes
- Getting dressed
- Cooking
- Eating
- Throwing a ball
- Bathing
- Making a bed
- Zipping a backpack up
Just thinking about how long and hard some tasks would be if you couldn’t cross midline makes me realize how much I take it for granted.
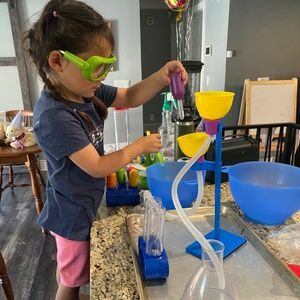
Water Transfer and Crossing Midline
Water transfer activities are fun for kids regardless of whether they’re working on crossing midline or not. It’s generally a motivating activity for most kids with endless ways to play.
The key for getting a lot of opportunities for crossing midline is the setup of the activity. I like this activity also because you probably have all the supplies you need. With that in mind, I do have a link at the bottom with my favorite water transfer toy. It’s a science kit I got for my daughter, and it has been a definite winner.
So, here’s a few examples of how to target the skill of crossing midline with water transfer.
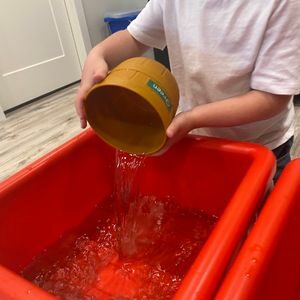
- Set out two bowls, one on the left side of your child and the other on the right side. Have one bowl empty and the other full. Use a small measuring cup to transfer the water back and forth.
- Give your child a bowl of water and a large cup with a handle. Have your child hold the cup handle with one hand, and let her transfer water with the other hand. This will help her not to transfer the measuring cup at midline
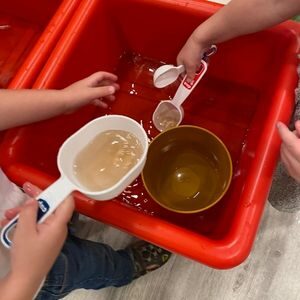
- Have multiple bowls of water and make them different colors with food coloring. Have your child match the colored water to the same colored bowl (if you have them) or use masking tape and label each empty bowl with the color.
- If you child seems to be favoring one side over the other, just move the bowls around to see if it will encourage crossing midline
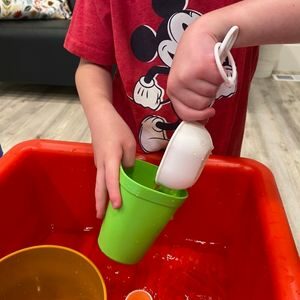
- Have different types of things to play with (spoons of different sizes, measuring spoons, measuring cups, eye droppers, squeeze bottles, etc.) place them in a container and have your child reach for what she wants, and put them back when she’s done.
Today’s post I wanted to mostly focus on crossing midline, but this is an activity that you can incorporate so many different skills into. If you’d like to learn how to adapt this activity to target other skills like language, math, science, directional awareness, eye-hand coordination, etc. the full version of this activity is available in the Early Intervention Activity Library.

Supply Ideas
- Bowls
- Spoons
- Measuring cups
- Eye droppers
Instructions
- Fill some bowls with water
- Give your child different spoons, cups, or eye droppers
- Allow your child to explore (even if it gets messy)
Extra Tips & Ideas
- This is a great activity to help kids increase attention on an activity
- Allow your child to lead the play
- This activity is fun at all stages of play, from cause and effect play to pretend play
- Adapt how you’re playing according to you’re child’s stage of play or what developmental skills you’re trying to target
- This activity is great for fine motor skills, crossing midline, bilateral coordination, eye-hand coordination and more.
Access The Full Tutorial

To gain full access to this tutorial and 70+ other activity and technique tutorials, become a member of The Early Intervention Tutorials
As a member of the EI Tutorials, you will learn how to:
- Identify a child’s developmental level
- Understand the stages of play
- Learn how to help a child with limited play skills
- Implement specific techniques to increase communication and engagement
- Adapt activities to different stages of development
- Target specific developmental skills, including: communication skills, cognitive skills, executive functioning, motor skills, social skills, and adaptive skills
Adapting to Different Stages of Play
Depending on a child’s stage of development, you’ll want to adapt this activity based on goals that would be appropriate for the child’s growth.
The stages of play are:
- Stage 1: Unoccupied Play
- Stage 2: Solitary Play
- Stage 3: Onlooker Play
- Stage 4: Parallel Play
- Stage 5: Associative Play
- Stage 6: Cooperative Play
I’ll share ideas on how to do this in the Early Intervention Tutorials. You can become a member and gain access to this tutorial by going to: https://autismearlylearning.com/ei-tutorials-info/
Developmental Skills
In this section, I’ll identify which areas of development this activity targets. I’ll also give some pointers on how to specifically target each area. You can become a member of the Early Intervention Tutorials by going to: https://autismearlylearning.com/ei-tutorials-info/
Download
- Printable Lesson Plan (only available in the Early Intervention Tutorials)
Links
As a Walmart Associate, I earn from qualifying purchases at no cost to you.

I highly recommend this science kit. It’s so much fun for kids. you can just use water, or you can add food coloring to mix colors. You can also add vinegar and baking soda for some variety. It’s fun with the different beakers, eye droppers, tubes, and microscope.

This is a simplified version of the other science kit

These jumbo eye droppers are great for little hands. They’re also fun squirters in the pool.

Any measuring cups will do, but these are fun and if you make “recipes” you can color code them with these measuring cups.

These types of bottles add to the fun of water transfer

I haven’t used these, but they had good reviews on Amazon. You can stick them to the wall of the bathtub and pour water into them.

These are fun for water or sand.

I haven’t used this one, but it looks fun!

I had this toy for my daughter. It was fun to fill up cups with the spout and not have to have the bathtub running all the time. It worked well until we moved and the batteries were still in it. (I have ruined a lot of toys by not taking the batteries out during our moves cross country)

Spray bottles are great for hand strength and they’re fun. I usually just get them for a dollar or two at the store.
